flowchart LR
  A([👋 Welcome Page]) ==> B([🛠️ Practice Trials])
  B ==> C([🧪 Experimental Trials])
  C ==> D([🏁 Goodbye Page])

  style A fill:#f8f9fa,stroke:#3498db,stroke-width:2px
  style B fill:#f8f9fa,stroke:#2ecc71,stroke-width:2px
  style C fill:#f8f9fa,stroke:#e74c3c,stroke-width:2px
  style D fill:#f8f9fa,stroke:#95a5a6,stroke-width:2px
Week 7: Presentation of PCIbex (Your first questionnaire)
CHC9012 | National Taiwan Normal University
Overview
This week, we will introduce the web-based platform PCIbex, which is used to design online questionnaires and experiments. By the end of this week, you will have the script of your very first experiment ready!
What to expect from the platform:
- Layout: What does this platform look like? Where do you type the script?
- Assistance: How to access the documentation and the user forum.
- Overall Presentation: Getting comfortable with the interface.
- Basics: Setting up your first experiment from scratch.
Writing a simple yet powerful script:
- Comments: How to comment a script on PCIbex to keep track of your structure.
- Elements: How to create texts, tasks, and visual components.
- Adjustments: How to adjust these elements to make them behave exactly as you want.
- Logging: How to ensure the relevant results are stored correctly on PCIbex.
A brief summary of the essential elements:
newTrial(...): Used to introduce a trial in the experiment.newText(...): Used to introduce a line of text.newTextInput(...): Used to prompt the participants to type their response.newButton(...): Used to insert a button in the experiment.newDropDown(...): Used to prompt the participants to select between several options.newScale(...): Used to display a scale on the screen.SendResults(...): Used to send the responses to the PCIbex server.
Please complete the following tasks before our next meeting:
- Download the (simple) script of this week
- Annotate each line of code (use your own words, these annotations are for your own reference!)
- Upload the annotated script on Moodle (you can upload the
.jsfile, or a Word or PDF file)
1. Presentation of the Interface
Before we begin coding, you need to access the platform and set up your workspace.
⚠️ Important: Please don’t forget to verify your email after signing up, otherwise you will only be allowed to create one experiment!
Explore the different parts of the PCIbex interface below:
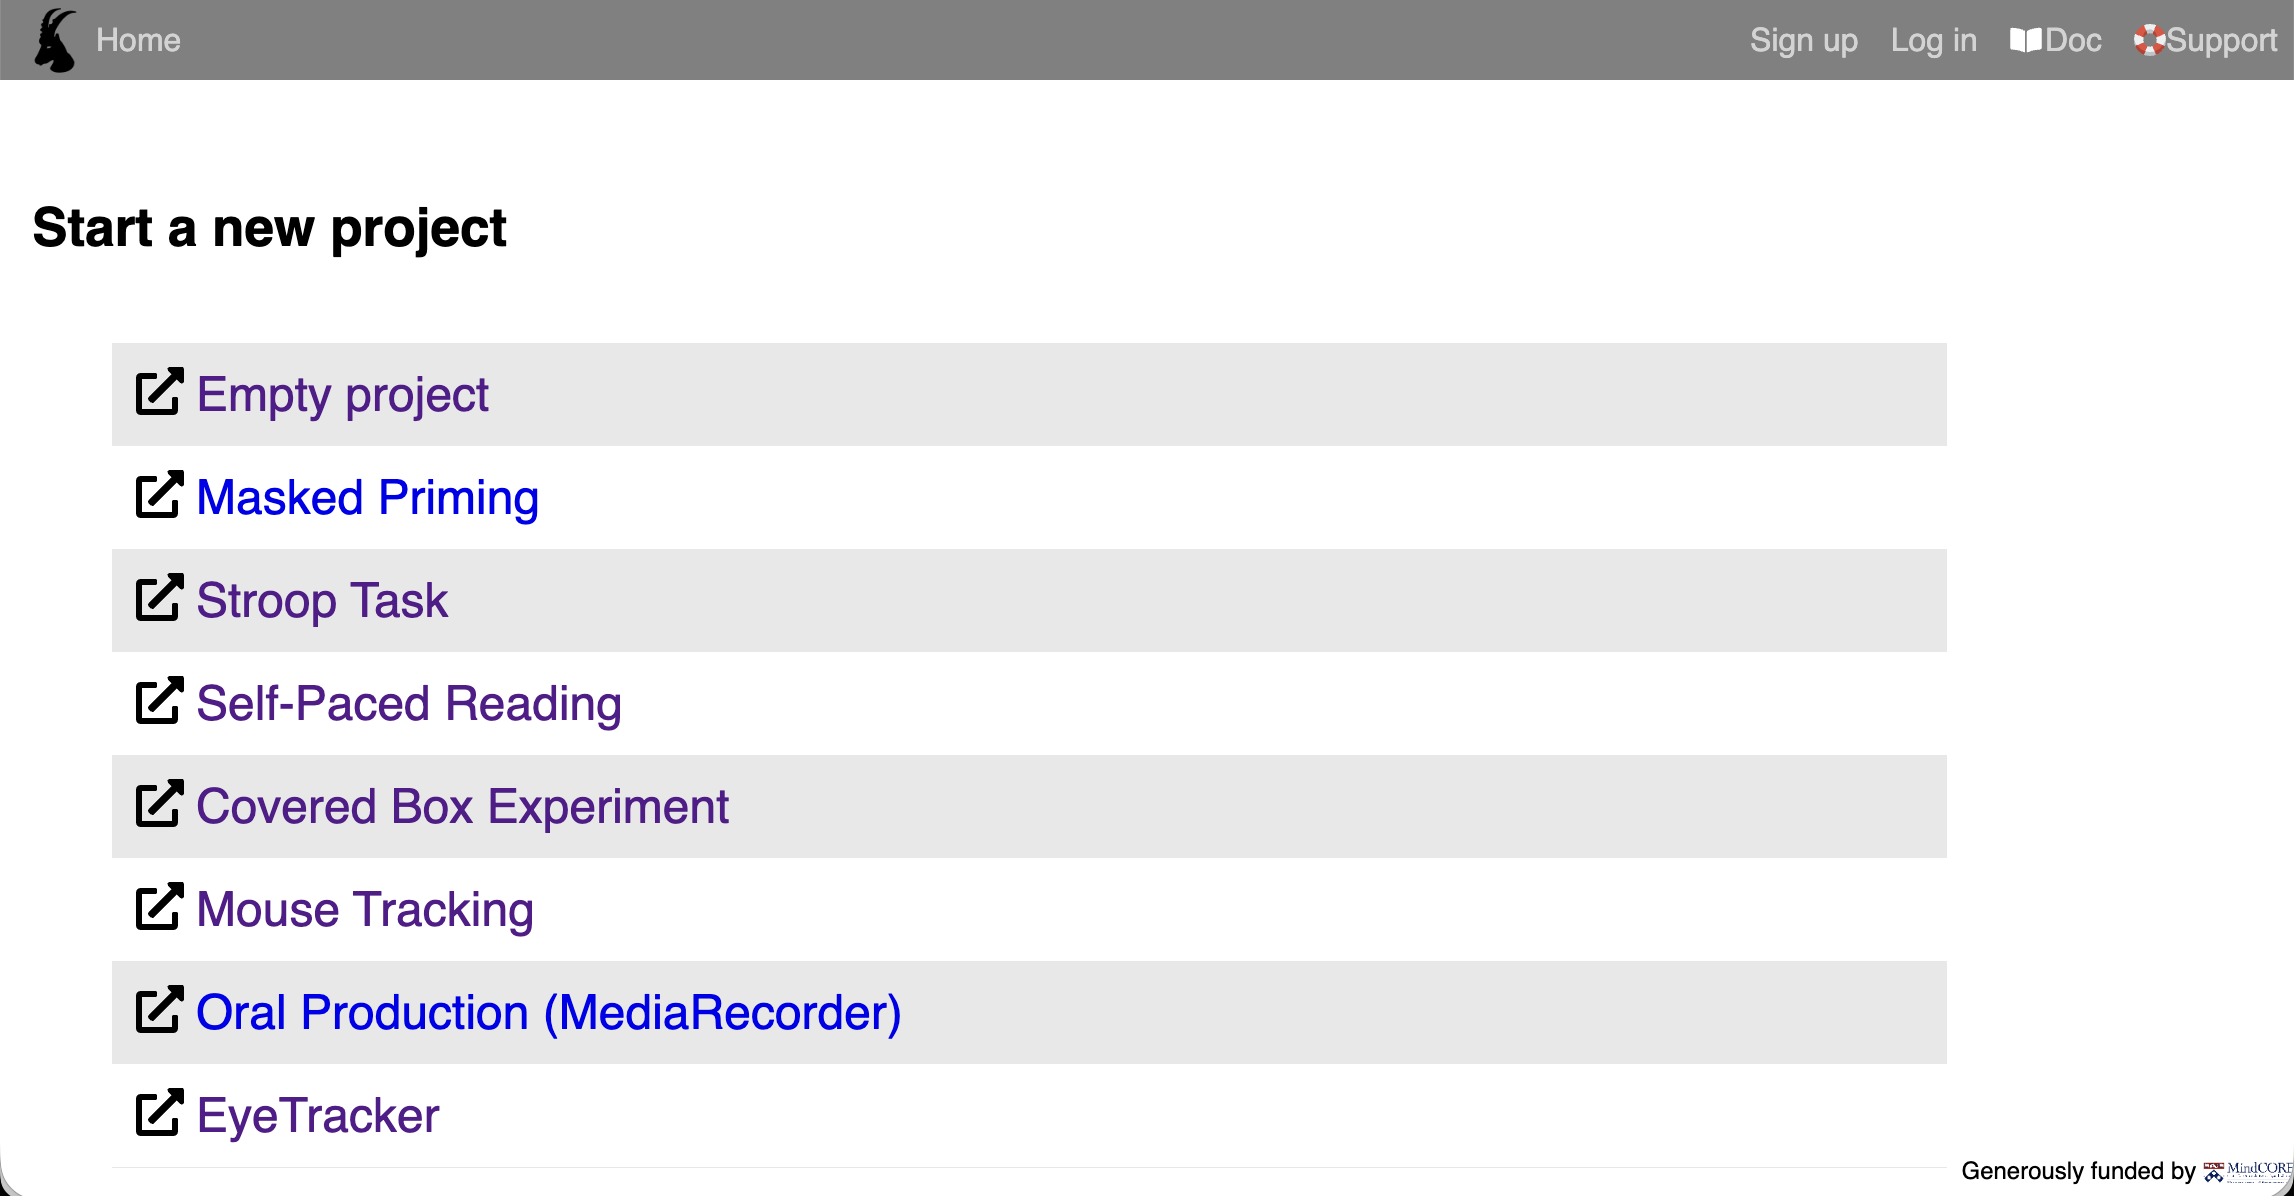
The first thing to do is to create an account (click on “Sign up”). Once you have created your personal account, you can log in.
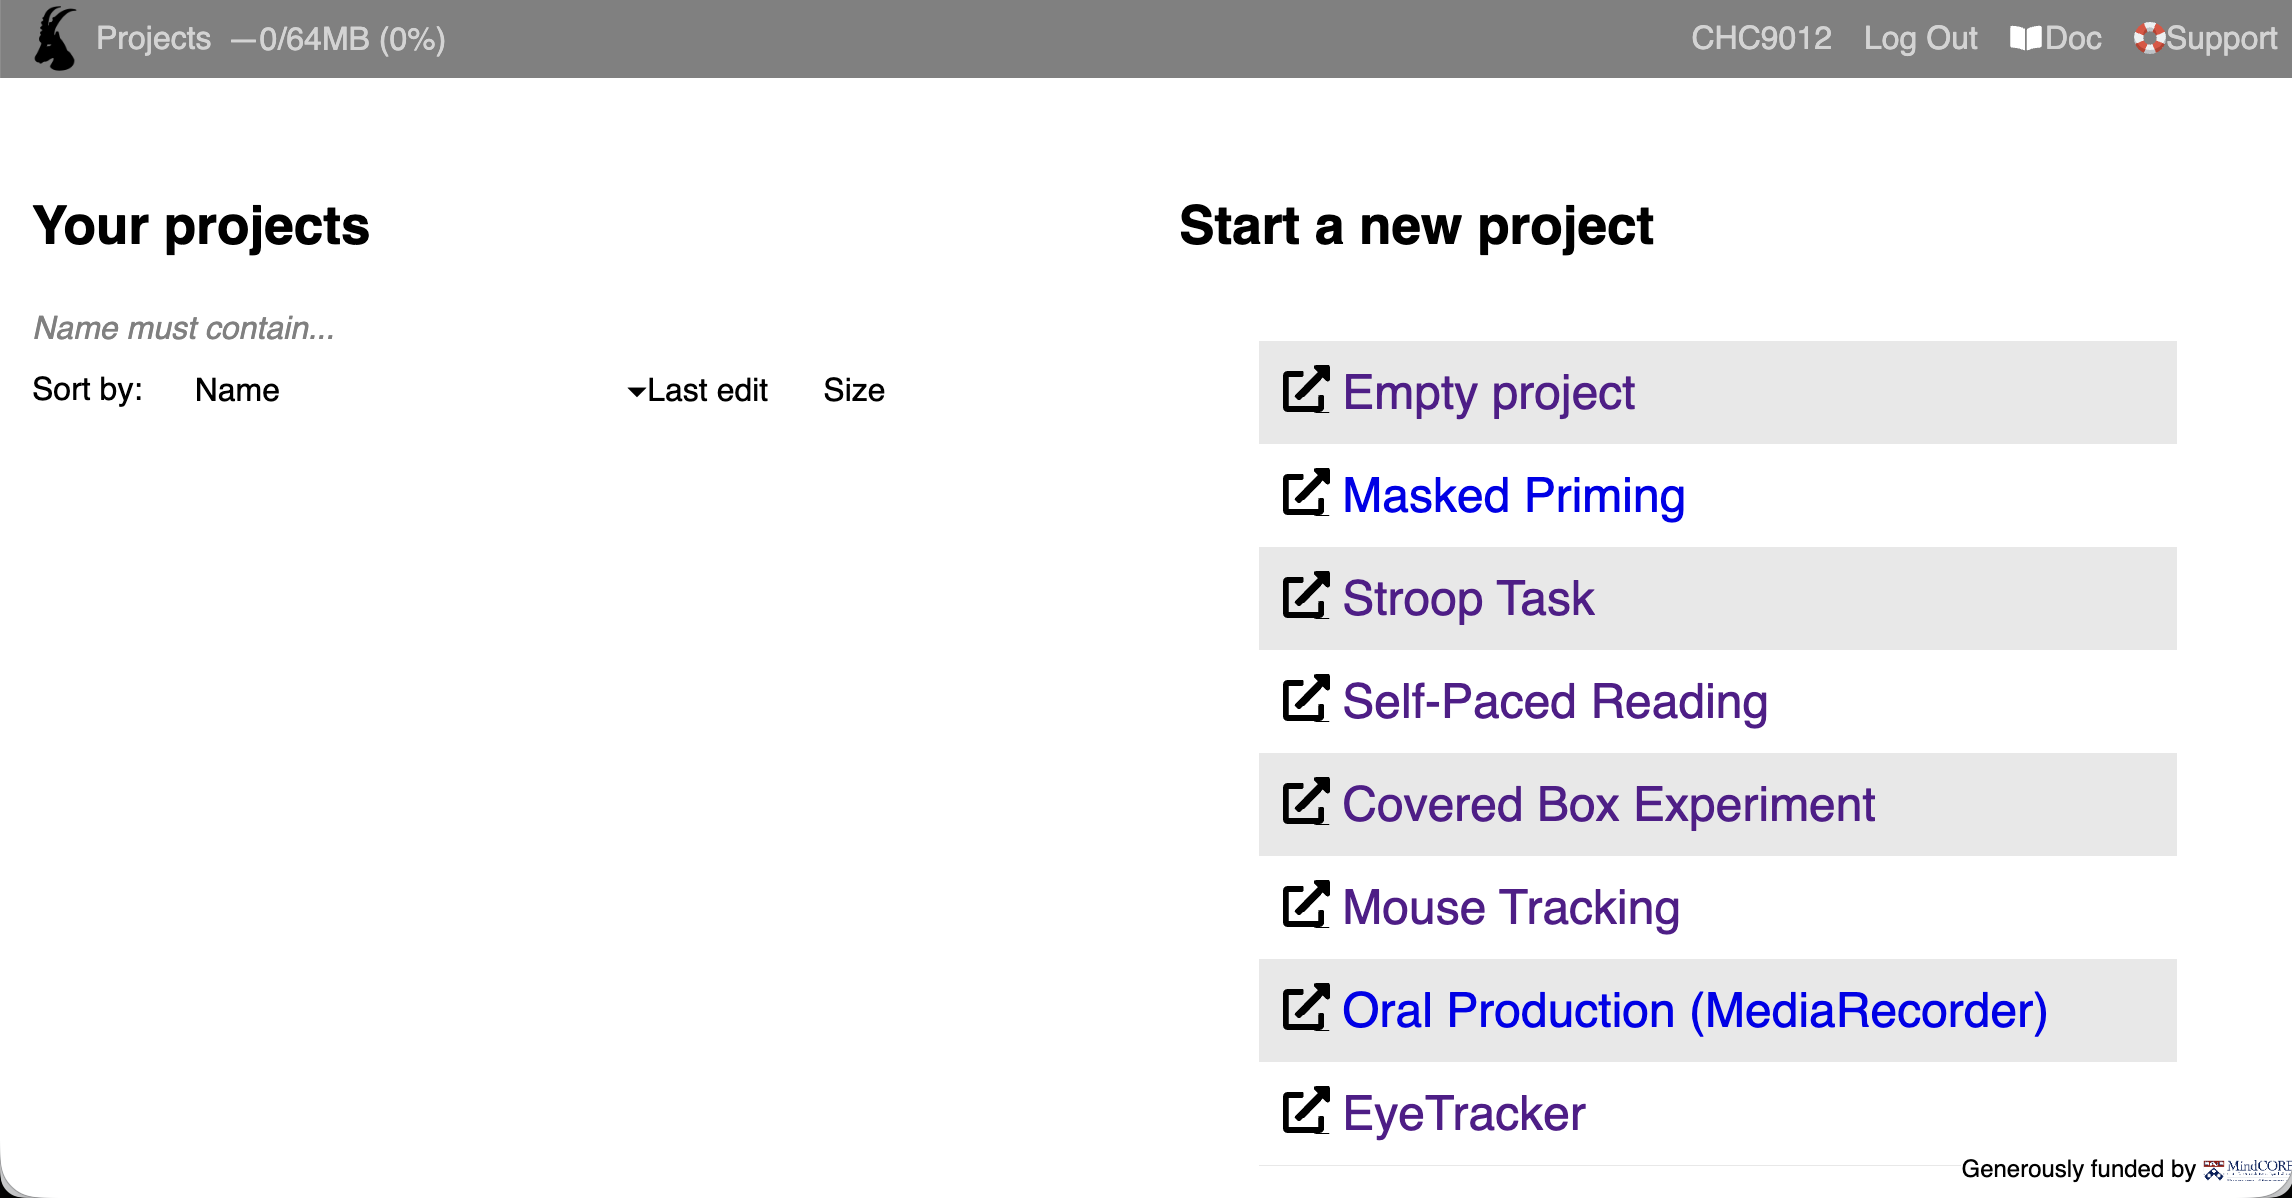
After logging in, you will see your dashboard. On the left side, you can find your projects. On the right side, you can find templates for specific paradigms.
Today, we will learn how to code a simple experiment from scratch. Let’s click on “Empty project”.
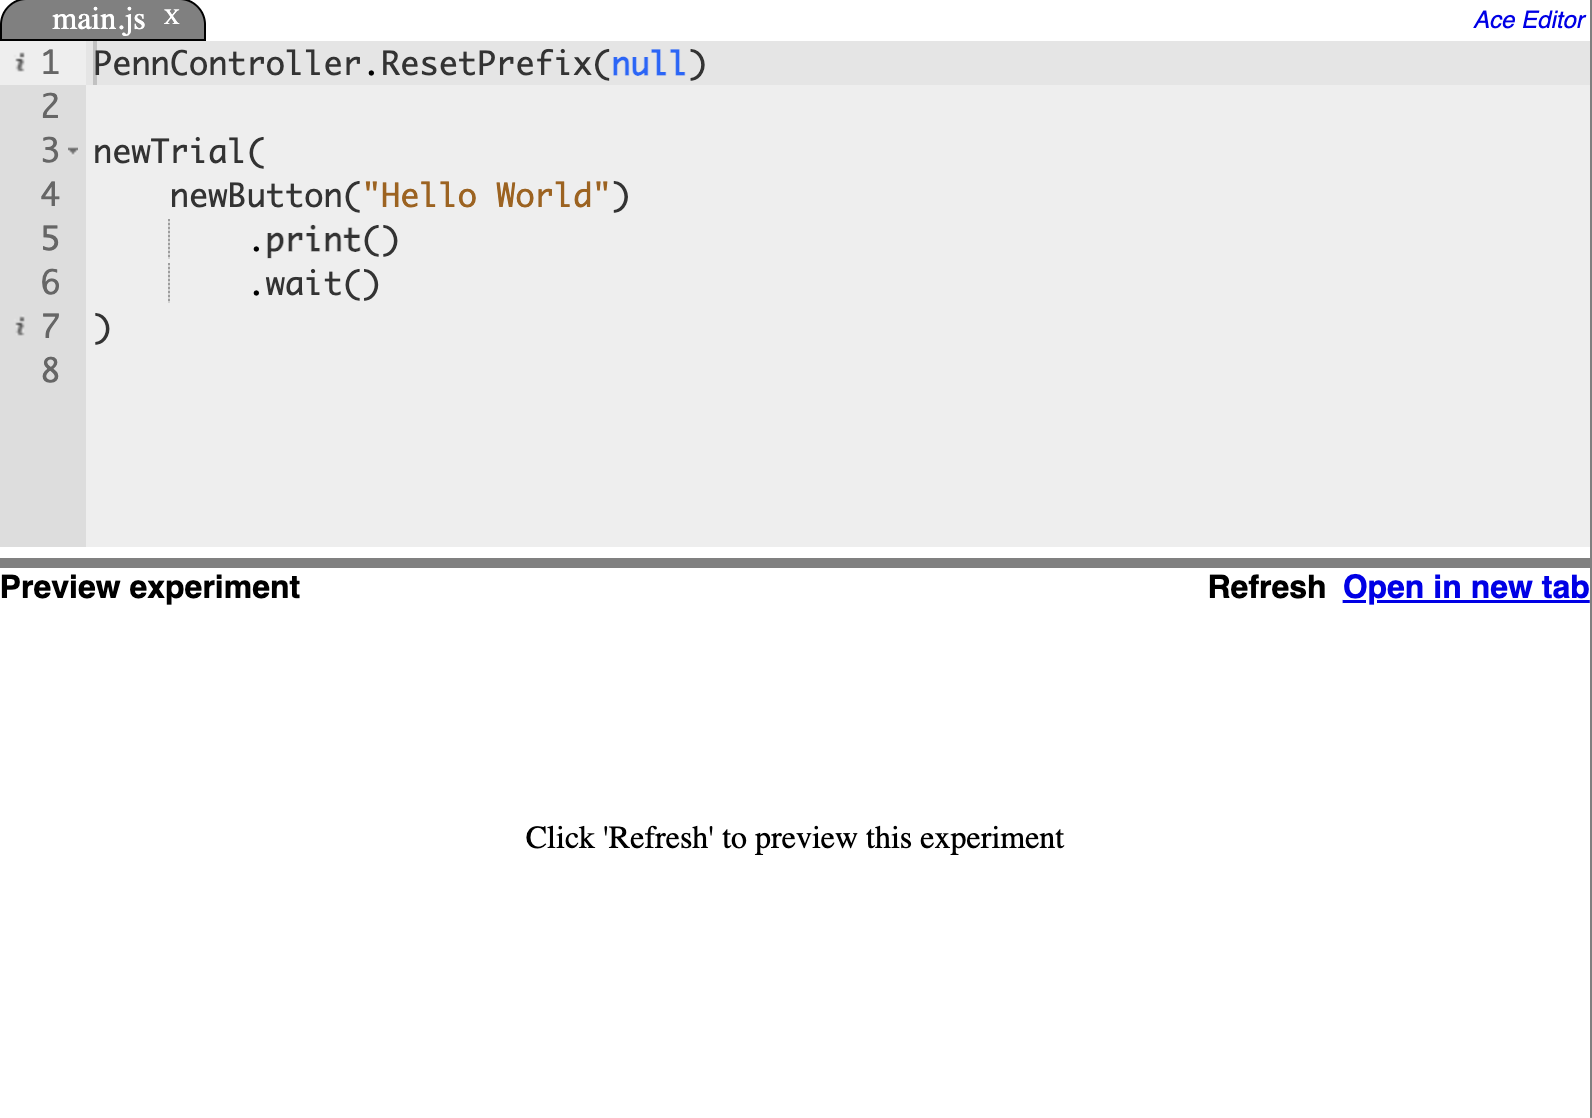
Once inside, you will see the main workspace.
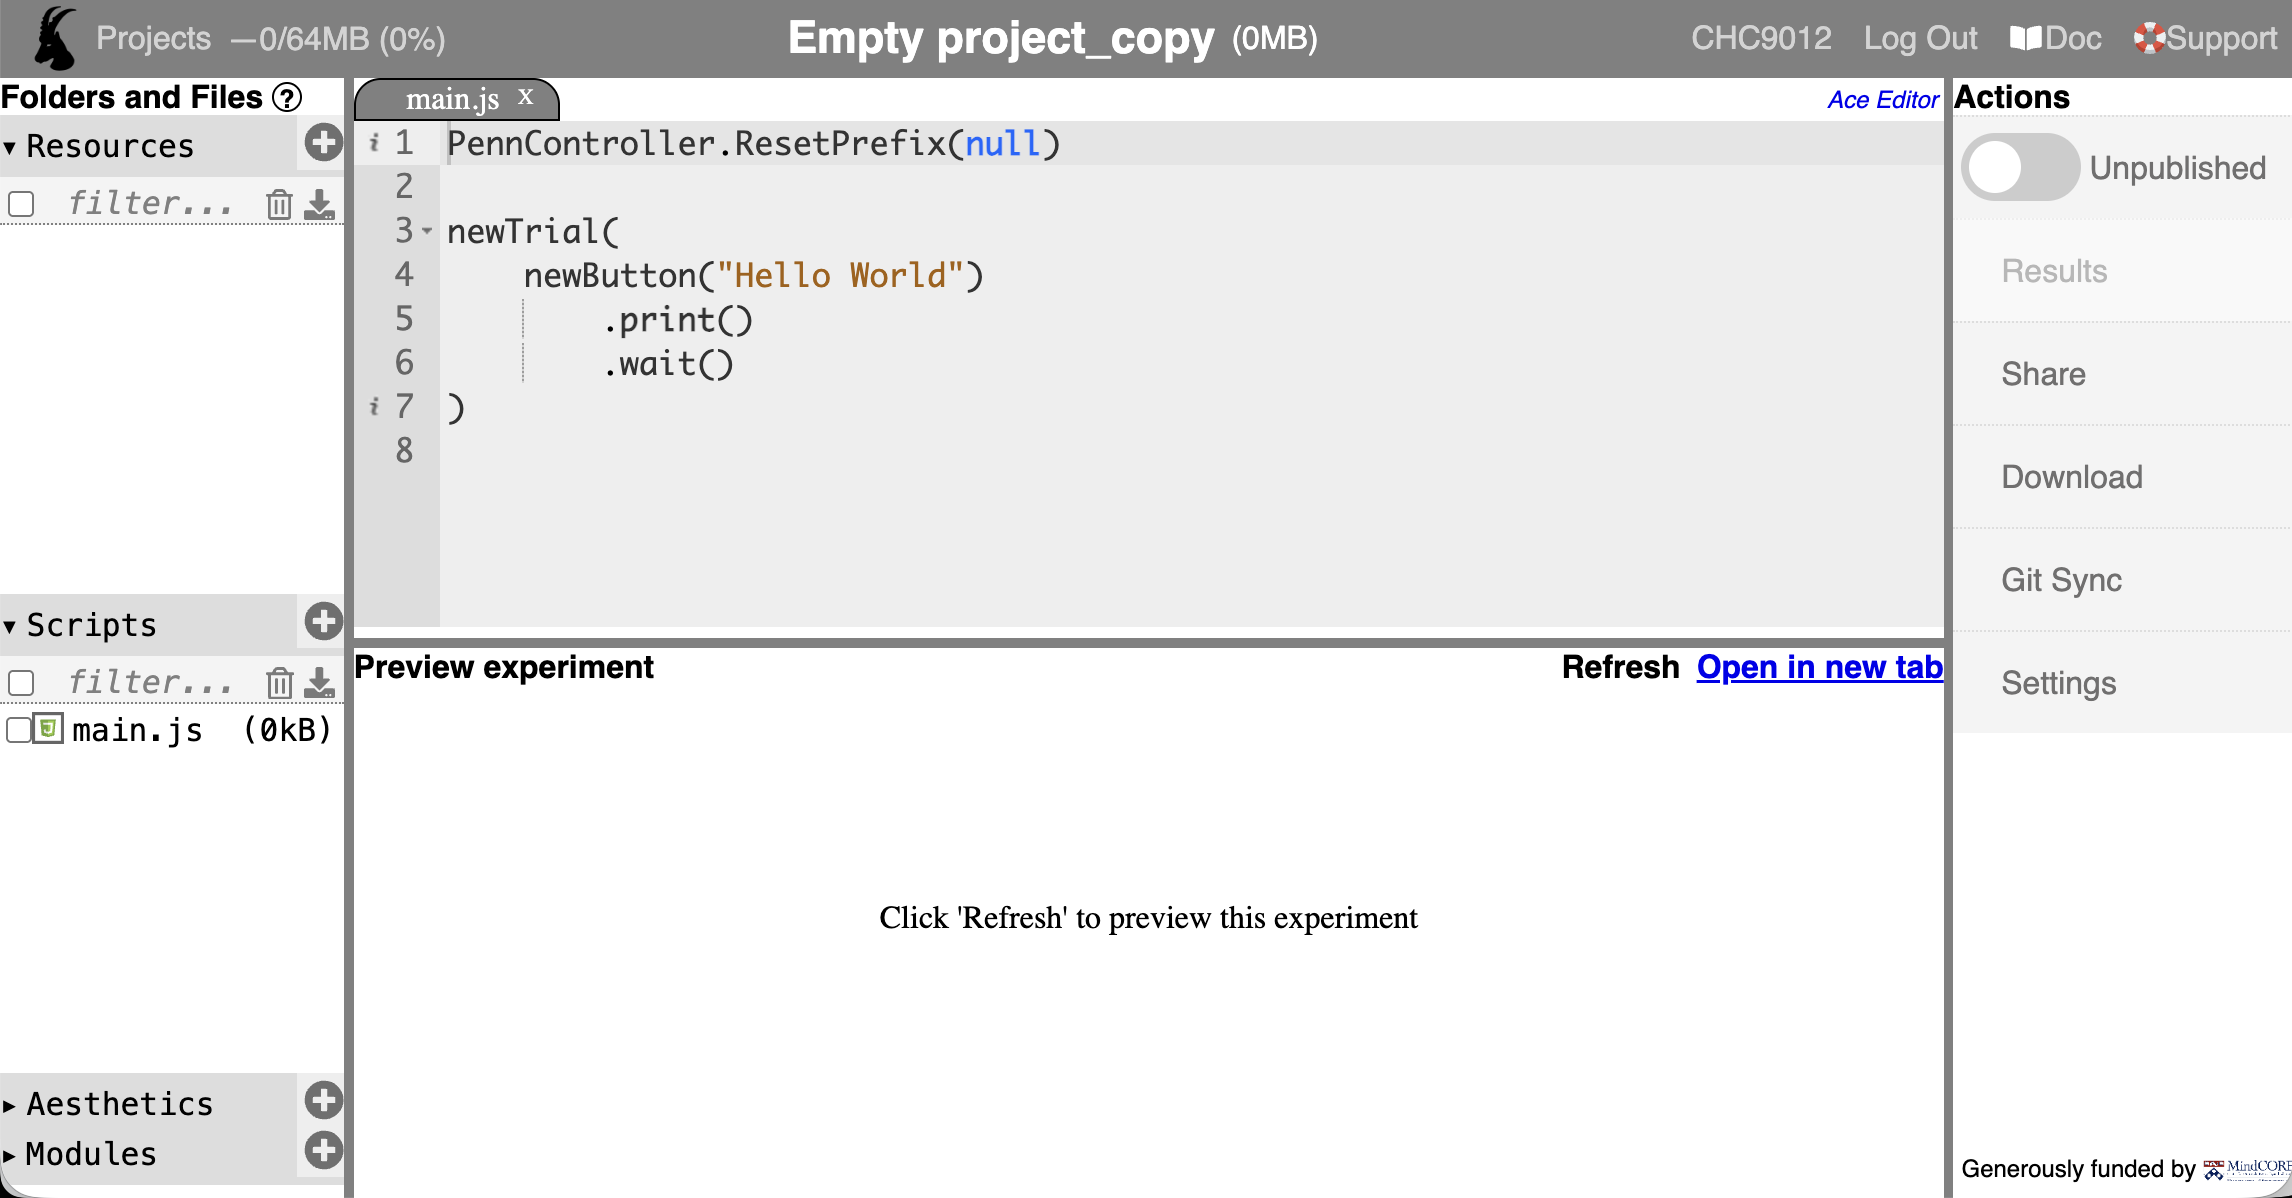
Can you see where it is written Empty project_copy? Click on it to change its name. Good to know: The participants won’t see this name when you share the experiment, so you can be very explicit with your naming conventions!

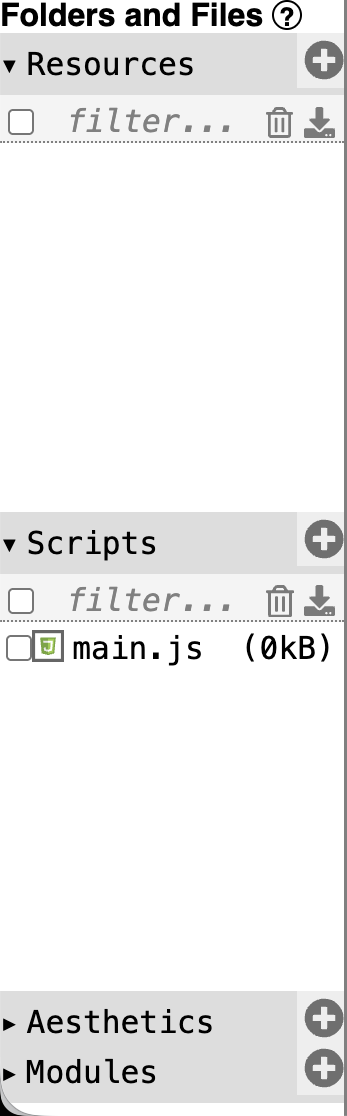
This section contains two main parts:
- Resources: So far, this is empty. This is where you upload files for your experiment (images, audio, or a
.csvfile where all your items can be found—we will talk about that next week!). - Scripts: There is already a file called
main.js. For simple experiments, this is enough. This is the file we modify to code the whole experiment.
Once you open a script or an Excel-like file, you can modify it directly here.
The best feature is that you can test your experiment anytime after modifying it just by clicking “Refresh”. (Be patient, it can take several seconds!)
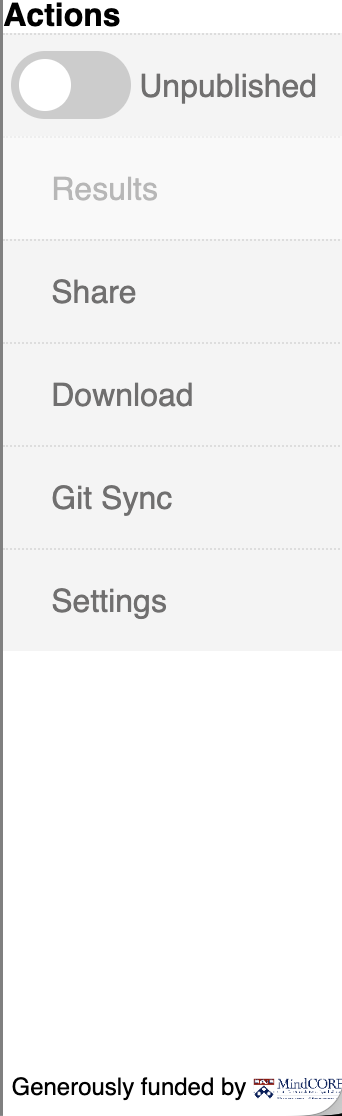
The last part is the “Actions” menu, which gives you several options:
- “Unpublished” button: Once your experiment is ready, click this before starting data collection! You can test your script as many times as you wish beforehand, and those test data will be stored separately.
- Results: Where you can find the downloaded data of your experiment.
- Share: Click this to obtain the public link to share your experiment online.
2. Let’s be organized: The structure of your experiment
2.1 Conceptual structure
Before you start typing any code, you must have a crystal-clear vision of the procedure for your experiment. Even though every experiment is unique, most follow a standard logical sequence:
The difference between experiments lies in the specific content of each of these blocks. You must be very explicit about what each section consists of before you begin.
✍️ Preparatory Activity: Map it out!
A highly effective way to visualize your overall procedure is to draw it by hand.
Sketch out a series of rectangles on a piece of paper, with each rectangle corresponding to a different step (Consent, Background, Instructions, etc.). Once you have drawn the whole experiment, your only remaining task is to “translate” those boxes into PCIbex code!
2.2 Create the structure on PCIbex: Comment lines
Now that we have our structure, let’s put it into PCIbex. Before writing the actual experiment commands, it is best practice to create a “skeleton” of your script using comments.
- Open the
main.jsfile in the PCIbex coding interface. - Delete all the default text except the very first line (
PennController.ResetPrefix(null)). - Build your outline using comments. In JavaScript, anything following two slashes
//is ignored by the computer.
Here is what you need to add. (Notice the green lines indicating what you should type):
  PennController.ResetPrefix(null)

+ /// 1. Welcome page
+ // 1.1 Hello page, ICF
+
+ // 1.2 Background questionnaire
+
+ // 1.3 Instructions
+
+ /// 2. Practice trials
+
+ /// 3. Experimental trials
+
+ /// 4. Goodbye page
⚠️ Important Note!
In the examples on this website, the + sign simply highlights that a line is a new addition to the script. You should not actually type the + sign!
Once you finish, your clean, organized main.js script should look exactly like this:
PennController.ResetPrefix(null)

/// 1. Welcome page
// 1.1 Hello page, ICF

// 1.2 Background questionnaire

// 1.3 Instructions

/// 2. Practice trials

/// 3. Experimental trials

/// 4. Goodbye page
3. Creation of your first experiment
Now we will build the actual content of the experiment step-by-step. Before that, we will need some basics:
We will be taking about “functions”, which are also refered to as elements in PCIbex. An element comes with a name and parentheses, such as:
newText(). The details to input in the parentheses.PCIbex is a platform to run experiments, and therefore it requires trials. Therefore, we always need to start with the
newTrial()element, even if it is not a trial in the proper sense.
📄 3.1 Welcome page
Texts and buttons
The welcome page consists of paragraphs with: - Welcoming words, - The Informed Consent Form, - Buttons to continue to the next pages, - Another page to collect personal information.
Let’s start with the welcome page, and as mentioned above, with a newTrial() element. We want to give a name to this element, and then add text, as follows.
/// 1. Welcome page
// 1.1 Hello page, ICF

newTrial("Welcome page",
+ newText("This is the welcome page.")
+ ,
+ newText("You can type the Informed Consent Form here.")
)
When you run these lines, you will realize that it does not work at all. And this is normal, it is just because we did not specify what to do with all these elements! We need to add commands to these elements. What we want is that these texts are (a) displayed (i.e., printed) on the screen, and that it does not automatically run into the next step. Here is the updated version:
/// 1. Welcome page
// 1.1 Hello page, ICF

newTrial("Welcome page",
    newText("This is the welcome page.")
+     .print()
+     .center() //You can add more commands like that
    ,
    newText("You can type the Informed Consent Form here.")
+     .print()
+     .center()
+     .wait() //Please remark that this command is placed at the last element
)
We are running into a new problem. The procedure “waits” as we asked to, but how to go to the next page? We can solve this by adding a “Continue” button (using the newButton() element).
/// 1. Welcome page
// 1.1 Hello page, ICF

newTrial("Welcome page",
    newText("This is the welcome page.")
        .print()
        .center()
    ,
    newText("You can type the Informed Consent Form here.")
        .print()
        .center()
-        .wait()
+   ,
+    newButton("Continue")
+        .center()
+        .print()
+        .wait() //Please remark that we moved the 'wait' command here
)
And we are done with this first page!
Texts, text inputs and dropdown
Next, we turn to the page where we collect personal information, such as the age of the participants, the highest degree they obtained, the languages they speak, etc. We already know how to type some text, so let’s start with this:
// 1.2 Background questionnaire

newTrial("Background information",
    newText("We will ask you some questions about your background. Please feel free to skip some questions if you do not wish to answer.")
        .print()
        .center()
        .wait()
    )
Now we need to add some text to prompt the participants to enter their age, and a box where they can directly write. We will proceed this way:
// 1.2 Background questionnaire

newTrial("Background information",
    newText("We will ask you some questions about your background. Please feel free to skip some questions if you do not wish to answer.")
        .print()
        .center()
-        .wait()
+    ,
+    newText("Your age:")
+        .print()
+        .center()
+    ,
+    newTextInput("Age") //Please not that we added "Age" just to refer back to this element later
+        .print()
+        .center()
+        .wait()
    )
Let’s say that we want to collect more data, but we want the participants to choose between different options. We will do that with the newDropDown() element, as follows:
// 1.2 Background questionnaire

newTrial("Background information",
    newText("We will ask you some questions about your background. Please feel free to skip some questions if you do not wish to answer.")
        .print()
        .center()
    ,
    newText("Your age:")
        .print()
        .center()
    ,
    newTextInput("Age")
        .print()
        .center()
-        .wait()
+    ,
+    newText("Your highest degree:")
+        .print()
+        .center()
+    ,
+    newDropDown("Degree", "Please select one option")
+        .add("Elementary school", "Junior high school", "Senior high school", "BA", "MA", "Ph.D.")
+        .print()
+        .center()
+        .wait()
    )
You can add as much as you want now that you understand the logic.
⚠️ Important! In the end, we will need to add a “Continue” button. If not, it will move to the next screen after the participants selected one option. Adding this button prevents such potential problems.
// 1.2 Background questionnaire

newTrial("Background information",
    newText("We will ask you some questions about your background. Please feel free to skip some questions if you do not wish to answer.")
        .print()
        .center()
    ,
    newText("Your age:")
        .print()
        .center()
    ,
    newTextInput("Age")
        .print()
        .center()
    ,
    newText("Your highest degree:")
        .print()
        .center()
    ,
    newDropDown("Degree", "Please select one option")
        .add("Elementary school", "Junior high school", "Senior high school", "BA", "MA", "Ph.D.")
        .print()
        .center()
-        .wait()
+    ,
+    newButton("Continue")
+        .center()
+        .print()
+        .wait()
    )
The story is not over yet, since we need to specify what information needs to be stored. We cover this point in Section 4.
Nothing new!
Now that you know how to add text, you just need to follow the same logic to add the instructions! Here is an example for this course:
// 1.3 Instructions

newTrial("Instructions",
    newText("This is the instruction page.")
        .print()
        .center()
    ,
    newText("In this experiment, you will ... [Please enter the instructions depending on your experiment].")
        .print()
        .center()
    ,
    newText("Example: In this experiment, you will read sentences on the screen. These sentences will appear one at a time. Your task is to judge these sentences [add a word about how to judge the sentences].")
        .print()
        .center()
    ,
    newText("Here is an example: 'I will must do it.' This sentence is not acceptable, please click on 'not acceptable'.")
        .print()
        .center()
    ,
    newText("Please click on 'I understood' if you read and understood the instructions.")
        .print()
        .center()
    ,
    newDropDown("InstructionsCheck", "Please select one option")
        .add("I read and understood the instructions.", "I did not read the instructions.")
        .print()
        .center()
    ,
    newButton("Continue")
        .center()
        .print()
        .wait()
    )
We just finished the first part of the experiment! The good news is that this is actually the most tedious coding part, so it will only get easier for the rest of the coding!
🧪 3.2 The experiment itself
Since many students decided to use written sentences as their experimental materials, the coding of the script for this experiment will be introduced based on this.
Texts and scales
Let’s start with something simple: How to display an experimental sentence. We already know how to do it, like below.
/// 2. Practice trials
newTrial("Practice",
    newText("FirstPractice", "This is a grammatical sentence")
        .print()
        .center()
        .wait()
    )
There is something different from before. We assigned a name to the newText() element (here, FirstPractice) such that we can keep track of the results from each sentence.
Let’s assume that this is an acceptability judgment experiment, using a 7-point Likert scale. Here is how to add this scale.
/// 2. Practice trials
newTrial("Practice",
    newText("FirstPractice", "This is a grammatical sentence")
        .print()
        .center()
-        .wait()
+    ,
+    newScale("Scale", "1", "2", "3", "4", "5", "6", "7")
+        .labelsPosition("bottom")
+        .print()
+        .center()
+        .wait()
    )
We just need to use the newScale() element, give it a name, and enter the scale itself. The command .labelsPosition() is used to display the parts of the scale on the screen. Finally, we can add what the labels mean to remind the participants how they are supposed to judge the sentences.
/// 2. Practice trials
newTrial("Practice",
    newText("FirstPractice", "This is a grammatical sentence")
        .print()
        .center()
    ,
    newScale("Scale", "1", "2", "3", "4", "5", "6", "7")
        .labelsPosition("bottom")
+        .before(newText("Not acceptable"))
+        .after(newText("Acceptable"))
        .print()
        .center()
        .wait()
    )
We are almost done. We need to add two screens: One before the practice trials to inform the participants that the practice trials are about to begin, and another one after, to mention that the practice is over and that the participants need to get ready before the official experiment begins.
/// 2. Practice trials

+ newTrial("AnnouncementPractice",
+     newText("The practice trials are about to begin.")
+         .print()
+         .center()
+     ,
+     newButton("Continue")
+         .center()
+         .print()
+         .wait()
+ )

newTrial("Practice",
    newText("FirstPractice", "This is a grammatical sentence")
        .print()
        .center()
    ,
    newScale("Scale", "1", "2", "3", "4", "5", "6", "7")
        .labelsPosition("bottom")
        .before(newText("Not acceptable"))
        .after(newText("Acceptable"))
        .print()
        .center()
        .wait()
    )

+ newTrial("AnnouncementEndPractice",
+     newText("The practice is over. Please click on 'Continue' to start the experiment.")
+         .print()
+         .center()
+     ,
+     newButton("Continue")
+         .center()
+         .print()
+         .wait()
+ )
Same as the practice trials, but there are more items!
Official trials need to exhibit the same format, so we need to use the exact same code, and change the variable names in addition to the experimental materials.
/// 3. Experimental trials

newTrial("Experiment",
    newText("FirstSentence", "This is another grammatical sentence")
        .print()
        .center()
    ,
    newScale("Scale", "1", "2", "3", "4", "5", "6", "7")
        .labelsPosition("bottom")
        .before(newText("Not acceptable"))
        .after(newText("Acceptable"))
        .print()
        .center()
        .wait()
    )

newTrial("Experiment",
    newText("SecondSentence", "This sentence not is grammatical")
        .print()
        .center()
    ,
    newScale("Scale", "1", "2", "3", "4", "5", "6", "7")
        .labelsPosition("bottom")
        .before(newText("Not acceptable"))
        .after(newText("Acceptable"))
        .print()
        .center()
        .wait()
    )
This is quite straightforward. But imagine if you have 140 sentences, then you will need to repeat this 140 times. In addition, presenting them in a random order using this method is not easy. We will see next week how to use a trick from PCIbex to make this simple.
👋 3.3 The goodbye page
The “goodbye page” is just a straightforward newText() element.
/// 4. Goodbye page

newTrial("Goodbye",
    newText("GoodbyeMessage", "Thank you very much for your participation!")
        .print()
        .center()
        )
There is a simple yet important trick we can play with. We can actually control when the results are sent to the server. Let’s say we only want the data of the participants who completed the experiment (and not of people who gave up in between). There is an element called SendResults(). We just need to place it right after the last trial and before the goodbye page to do so!
/// 4. Goodbye page

+ SendResults()

newTrial("Goodbye",
    newText("GoodbyeMessage", "Thank you very much for your participation!")
        .print()
        .center()
        )
4. Adjusting the script
Once the basic structure is working, we need to fine-tune what data we are collecting and how the experiment looks to the participants.
4.1 What results to store? The log function
Let’s run the script we wrote so far. By the end of the experiment, there is a screen saying that it successfully sent the information to the server. We just need to click on Results and download the file. Here is what we obtain.

We can indeed find all the elements we wrote… and yet, we cannot see the answers for the personal information, or the acceptability data!
No panic. This is only because we did not ask PCIbex to store such data, only to display them.
We will have to use the .log() command to ensure PCIbex records the exact data points you need for the analyses.
Here is the final script updated with the .log() commands.
Click to unpack the whole code
PennController.ResetPrefix(null)

/// 1. Welcome page
// 1.1 Hello page, ICF

newTrial("Welcome page",
    newText("This is the welcome page.")
        .print()
        .center()
    ,
    newText("You can type the Informed Consent Form here.")
        .print()
        .center()
,
    newButton("Continue")
        .center()
        .print()
        .wait()
)

// 1.2 Background questionnaire

newTrial("Background information",
    newText("We will ask you some questions about your background. Please feel free to skip some questions if you do not wish to answer.")
        .print()
        .center()
    ,
    newText("Your age:")
        .print()
        .center()
    ,
    newTextInput("Age")
        .print()
        .center()
+        .log("final")
    ,
    newText("Your highest degree:")
        .print()
        .center()
    ,
    newDropDown("Degree", "Please select one option")
        .add("Elementary school", "Junior high school", "Senior high school", "BA", "MA", "Ph.D.")
        .print()
        .center()
+        .log()
    ,
    newButton("Continue")
        .center()
        .print()
        .wait()
    )

// 1.3 Instructions

newTrial("Instructions",
    newText("This is the instruction page.")
        .print()
        .center()
    ,
    newText("In this experiment, you will ... [Please enter the instructions depending on your experiment].")
        .print()
        .center()
    ,
    newText("Example: In this experiment, you will read sentences on the screen. These sentences will appear one at a time. Your task is to judge these sentences [add a word about how to judge the sentences].")
        .print()
        .center()
    ,
    newText("Here is an example: 'I will must do it.' This sentence is not acceptable, please click on 'not acceptable'.")
        .print()
        .center()
    ,
    newText("Please click on 'I understood' if you read and understood the instructions.")
        .print()
        .center()
    ,
    newDropDown("InstructionsCheck", "Please select one option")
        .add("I read and understood the instructions.", "I did not read the instructions.")
        .print()
        .center()
+        .log()
    ,
    newButton("Continue")
        .center()
        .print()
        .wait()
    )

/// 2. Practice trials

newTrial("AnnouncementPractice",
    newText("The practice trials are about to begin.")
        .print()
        .center()
    ,
    newButton("Continue")
        .center()
        .print()
        .wait()
)

newTrial("Practice",
    newText("FirstPractice", "This is a grammatical sentence")
        .print()
        .center()
+        .log()
    ,
    newScale("Scale", "1", "2", "3", "4", "5", "6", "7")
        .labelsPosition("bottom")
        .before(newText("Not acceptable"))
        .after(newText("Acceptable"))
        .print()
        .center()
        .wait()
+        .log()
    )

newTrial("AnnouncementEndPractice",
    newText("The practice is over. Please click on 'Continue' to start the experiment.")
        .print()
        .center()
    ,
    newButton("Continue")
        .center()
        .print()
        .wait()
)

/// 3. Experimental trials

newTrial("Experiment",
    newText("FirstSentence", "This is another grammatical sentence")
        .print()
        .center()
+        .log()
    ,
    newScale("Scale", "1", "2", "3", "4", "5", "6", "7")
        .labelsPosition("bottom")
        .before(newText("Not acceptable"))
        .after(newText("Acceptable"))
        .print()
        .center()
        .wait()
+        .log()
    )

newTrial("Experiment",
    newText("SecondSentence", "This sentence not is grammatical")
        .print()
        .center()
+        .log()
    ,
    newScale("Scale", "1", "2", "3", "4", "5", "6", "7")
        .labelsPosition("bottom")
        .before(newText("Not acceptable"))
        .after(newText("Acceptable"))
        .print()
        .center()
        .wait()
+        .log()
    )


/// 4. Goodbye page
SendResults()
newTrial("Goodbye",
    newText("GoodbyeMessage", "Thank you very much for your participation!")
        .print()
        .center()
        .wait()
        )
Now we can see the results! (As you can see, it is not an effective way to store the actual sentences that have been displayed. Again, we will cover a much more efficient way to solve this problem next week)

4.2 Details of the procedure and the aesthetics
We covered the basics of experiment building on PCIbex. So far, we have a very functional script, but it is not very appealing. There are many options to change the aesthetics of the experiment, and I invite you to have a look at the PCIbex documentation.
Alternatively, I found that AI tools can be quite useful to improve the overall aesthetics. You can always have a try, and now that you understand the basics of the script, you know what it changed, and how to change back or adjust if it is not your taste!
Caution
Always be careful when using AI to change the aesthetics, as it is not completely naive. Changing the size of the text, the fonts, the color, or anything, may have an impact on the results. In addition, AI may change some codes such that in the end the results are not properly saved. Always check, double check, triple check!
Click here to see the AI-augmented script – Same experiment, different aesthetics
PennController.ResetPrefix(null)

/// 1. Welcome page
// 1.1 Hello page, ICF
newTrial("Welcome page",
    // Premium Defaults: High-end typography, modern colors, and pill-shaped buttons with shadows
    defaultText
        .css("font-family", "'Segoe UI', Roboto, Helvetica, Arial, sans-serif")
        .css("color", "#2c3e50")
        .css("line-height", "1.6")
        .center(),
    defaultButton
        .css("background-color", "#3498db")
        .css("color", "white")
        .css("border", "none")
        .css("border-radius", "30px") // Pill shape
        .css("padding", "12px 30px")
        .css("font-size", "1.1em")
        .css("font-weight", "bold")
        .css("box-shadow", "0 4px 15px rgba(52, 152, 219, 0.3)") // Soft glow shadow
        .css("cursor", "pointer")
        .center(),

    newText("welcome_title", "<h1 style='color: #2c3e50; font-size: 2.5em; margin-bottom: 0.2em;'>Welcome to the Study</h1>").print(),
    newText("divider", "<hr style='width: 50%; border: 1px solid #ecf0f1; margin-bottom: 2em;'>").print(),

    newText("icf_text", "<div style='background-color: #f8f9fa; padding: 25px; border-radius: 12px; border-left: 5px solid #3498db; max-width: 600px; text-align: left;'><b>Informed Consent</b><br><br>Please read the following carefully. You can type your official consent form here. The box creates a neat, contained reading area for the participant, making it feel like a professional document.</div>").print(),

    newText("spacer1", "<br><br>").print(),
    newButton("I Agree & Continue").print().wait()
)

// 1.2 Background questionnaire
newTrial("Background information",
    defaultText.css("font-family", "'Segoe UI', Roboto, Helvetica, Arial, sans-serif").css("color", "#2c3e50").center(),
    defaultTextInput.css("padding", "10px").css("border", "1px solid #bdc3c7").css("border-radius", "6px").css("font-size", "1em").css("width", "250px").center(),
    defaultDropDown.css("padding", "10px").css("border", "1px solid #bdc3c7").css("border-radius", "6px").css("font-size", "1em").css("width", "270px").center(),
    defaultButton.css("background-color", "#3498db").css("color", "white").css("border", "none").css("border-radius", "30px").css("padding", "12px 30px").css("font-size", "1.1em").css("font-weight", "bold").css("box-shadow", "0 4px 15px rgba(52, 152, 219, 0.3)").center(),

    newText("bg_intro", "<h2 style='color: #2c3e50;'>Participant Background</h2><p style='color: #7f8c8d; margin-bottom: 2em;'>Please provide some basic information. You may skip any question you prefer not to answer.</p>").print(),

    newText("age_prompt", "<b>Your age:</b><br>").print(),
    newTextInput("Age").print().log("final"),

    newText("spacer2", "<br>").print(),

    newText("degree_prompt", "<b>Your highest degree:</b><br>").print(),
    newDropDown("Degree", "Please select one option")
        .add("Elementary school", "Junior high school", "Senior high school", "BA", "MA", "Ph.D.")
        .print()
        .log(),

    newText("spacer3", "<br><br>").print(),
    newButton("Next Step").print().wait()
)

// 1.3 Instructions
newTrial("Instructions",
    defaultText.css("font-family", "'Segoe UI', Roboto, Helvetica, Arial, sans-serif").css("color", "#2c3e50").center(),
    defaultDropDown.css("padding", "10px").css("border", "1px solid #bdc3c7").css("border-radius", "6px").css("font-size", "1em").center(),
    defaultButton.css("background-color", "#3498db").css("color", "white").css("border", "none").css("border-radius", "30px").css("padding", "12px 30px").css("font-size", "1.1em").css("font-weight", "bold").css("box-shadow", "0 4px 15px rgba(52, 152, 219, 0.3)").center(),

    newText("inst_title", "<h2>Instructions</h2>").print(),

    newText("inst_box", "<div style='background-color: #fff; padding: 30px; border-radius: 12px; box-shadow: 0 10px 30px rgba(0,0,0,0.05); max-width: 600px; text-align: left; line-height: 1.8;'><h3 style='margin-top: 0; color: #e74c3c;'>Your Task</h3>In this experiment, you will read sentences on the screen.<br>These sentences will appear one at a time.<br><br><b>Example:</b><br><i style='color: #7f8c8d;'>\"I will must do it.\"</i><br><br>This sentence is not acceptable, so you would click on <b>Not acceptable</b>.</div>").print(),

    newText("spacer4", "<br><br>").print(),

    newText("inst_confirm", "<b>Please confirm to proceed:</b><br>").print(),
    newDropDown("InstructionsCheck", "Select an option...")
        .add("I have read and understand the instructions.", "I need more time.")
        .print()
        .log(),

    newText("spacer5", "<br><br>").print(),
    newButton("Begin Practice").print().wait()
)

/// 2. Practice trials
newTrial("AnnouncementPractice",
    defaultText.css("font-family", "'Segoe UI', Roboto, Helvetica, Arial, sans-serif").center(),
    defaultButton.css("background-color", "#2ecc71").css("color", "white").css("border", "none").css("border-radius", "30px").css("padding", "12px 30px").css("font-size", "1.1em").css("font-weight", "bold").css("box-shadow", "0 4px 15px rgba(46, 204, 113, 0.3)").center(), // Green button for "Go"

    newText("prac_announce", "<h1 style='color: #2ecc71; font-size: 3em; margin-bottom: 0;'>Practice Phase</h1><p style='color: #7f8c8d; font-size: 1.2em; margin-bottom: 2em;'>Let's do a quick warm-up.</p>").print(),
    newButton("Start").print().wait()
)

newTrial("Practice",
    defaultText.css("font-family", "'Segoe UI', Roboto, Helvetica, Arial, sans-serif").css("color", "#2c3e50").center(),

    // Large, highly legible target sentence
    newText("FirstPractice", "<div style='font-size: 2em; margin-top: 2em; margin-bottom: 1.5em; font-weight: 500;'>This is a grammatical sentence.</div>").print().log(),

    newScale("Scale", "1", "2", "3", "4", "5", "6", "7")
        .labelsPosition("bottom")
        .before(newText("left_label", "<b style='color: #e74c3c;'>Not acceptable</b>").css("font-size", "1em").css("margin-right", "2em"))
        .after(newText("right_label", "<b style='color: #2ecc71;'>Acceptable</b>").css("font-size", "1em").css("margin-left", "2em"))
        .center()
        .print()
        .wait()
        .log()
)

newTrial("AnnouncementEndPractice",
    defaultText.css("font-family", "'Segoe UI', Roboto, Helvetica, Arial, sans-serif").center(),
    defaultButton.css("background-color", "#9b59b6").css("color", "white").css("border", "none").css("border-radius", "30px").css("padding", "12px 30px").css("font-size", "1.1em").css("font-weight", "bold").css("box-shadow", "0 4px 15px rgba(155, 89, 182, 0.3)").center(), // Purple button for main experiment

    newText("end_prac", "<h2 style='color: #8e44ad;'>Practice Complete</h2><p style='color: #7f8c8d; font-size: 1.2em; margin-bottom: 2em;'>You are now ready for the real experiment.</p>").print(),
    newButton("Start Experiment").print().wait()
)

/// 3. Experimental trials
newTrial("Experiment",
    defaultText.css("font-family", "'Segoe UI', Roboto, Helvetica, Arial, sans-serif").css("color", "#2c3e50").center(),

    newText("FirstSentence", "<div style='font-size: 2em; margin-top: 2em; margin-bottom: 1.5em; font-weight: 500;'>This is another grammatical sentence.</div>").print().log(),

    newScale("Scale", "1", "2", "3", "4", "5", "6", "7")
        .labelsPosition("bottom")
        .before(newText("left_label", "<b style='color: #e74c3c;'>Not acceptable</b>").css("font-size", "1em").css("margin-right", "2em"))
        .after(newText("right_label", "<b style='color: #2ecc71;'>Acceptable</b>").css("font-size", "1em").css("margin-left", "2em"))
        .center()
        .print()
        .wait()
        .log()
)

newTrial("Experiment",
    defaultText.css("font-family", "'Segoe UI', Roboto, Helvetica, Arial, sans-serif").css("color", "#2c3e50").center(),

    newText("SecondSentence", "<div style='font-size: 2em; margin-top: 2em; margin-bottom: 1.5em; font-weight: 500;'>This sentence not is grammatical.</div>").print().log(),

    newScale("Scale", "1", "2", "3", "4", "5", "6", "7")
        .labelsPosition("bottom")
        .before(newText("left_label", "<b style='color: #e74c3c;'>Not acceptable</b>").css("font-size", "1em").css("margin-right", "2em"))
        .after(newText("right_label", "<b style='color: #2ecc71;'>Acceptable</b>").css("font-size", "1em").css("margin-left", "2em"))
        .center()
        .print()
        .wait()
        .log()
)

/// 4. Goodbye page
SendResults()
newTrial("Goodbye",
    defaultText.css("font-family", "'Segoe UI', Roboto, Helvetica, Arial, sans-serif").center(),

    newText("GoodbyeMessage", "<div style='margin-top: 3em;'><h1 style='color: #3498db; font-size: 3em; margin-bottom: 0;'>Thank You!</h1><p style='color: #7f8c8d; font-size: 1.5em;'>Your responses have been successfully recorded.</p></div>")
        .print()
        .wait()
)
📝 Assignment for next week
Please complete the following tasks before our next meeting: - Download the (simple) script of this week - Annotate each line of code (use your own words, these annotations are for your own reference!) - Upload the annotated script on Moodle (you can upload the .js file, or a Word or PDF file)